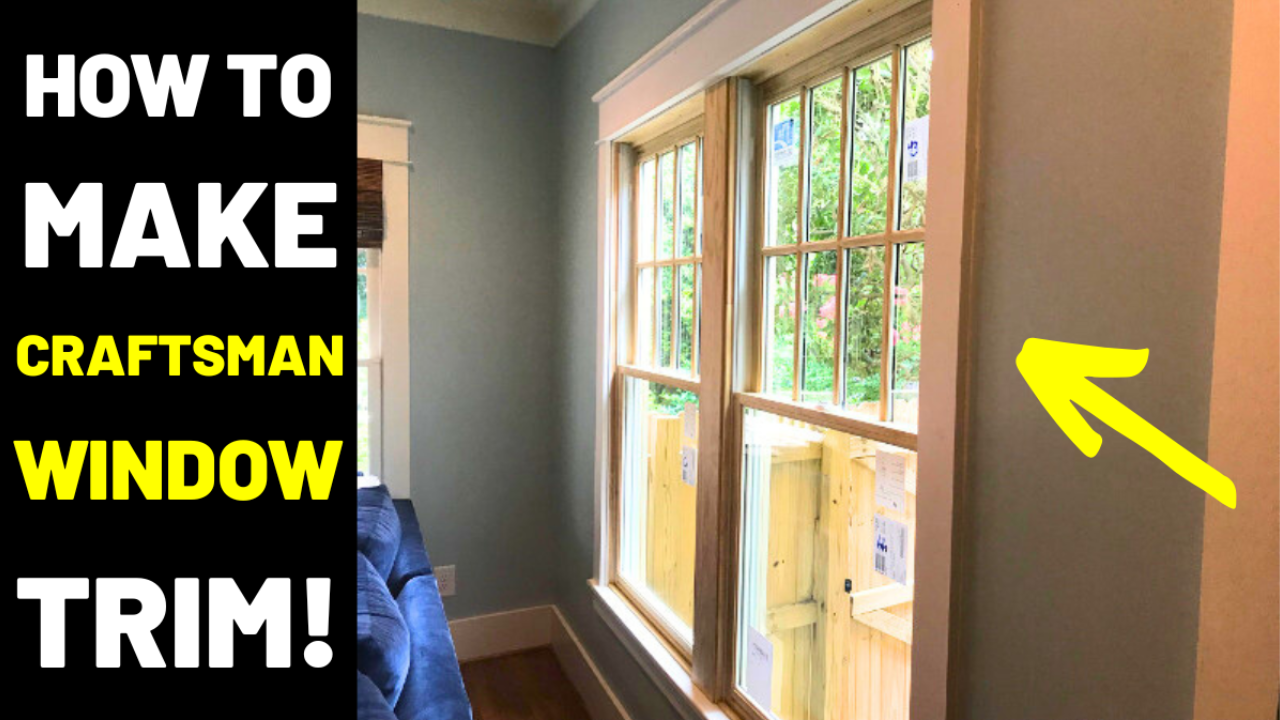
CRAFTSMAN WINDOW TRIM – IT’S EASY!
Apr 15, 2024Craftsman window trim profiles are based on a classic design that looks good in every home. And, not only are these trim profiles beautiful–they’re also simple to build and install!
This article and short video from The Honest Carpenter walks you through a craftsman window trim installation. Along the way, you’ll learn about craftsman design concepts. Plus, best methods for saving money on your craftsman window project.
(The content below contains some affiliate links.)
CRAFTSMAN WINDOW TRIM TOOL LIST:
Orbital Palm Sander (Optional)
BEST PICKS:
In my opinion, there is no better contractor-grade table saw than DEWALT’S 700 line.
A good MITER SAW is utterly essential to trim projects like this.
Likewise, a COMPRESSOR /BRAD NAILER combo will speed things up tenfold. Porter Cable seems to have the best deal with the highest review rating:
Swanson’s COMBINATION SQUARE package is all I’ve ever needed for squares:
MATERIAL LIST:
Brad Nails
Pre-prime Pine Trim
CRAFTSMAN WINDOW TRIM OVERVIEW:
Installing custom craftsman window trim is really not that complicated. First, make a series of accurate measurements and cuts. Then you shoot the casings into place with a handful of well-placed fasteners.
That said, making nice craftsman window trim profiles is nearly impossible without using power tools. Cuts need to be sharp and clean. Additionally, fasteners need to be driven quickly and without heavy force.
A decent compressor and brad nailer are essential. Plus, you also need a variety of brad nails to shoot through the varying wood thicknesses. Luckily, if you don’t feel like buying boxes of every size, brad combo packs are available.
Also, I feel that a miter saw is just indispensable for this project (and any other trim project). While I advocate for the best tools possible, I know not everyone needs a pro-grade saw. Even a smaller 10″ hobby saw can be effective enough to make good clean cuts on casings.
With the right tools at hand, you’re ready to begin!
HOW CRAFTSMAN WINDOW TRIM WORKS:
Craftsman window trim is a general trim design profile based on the elements of classical architecture. This style of window trim can be extremely ornate. Or it can be incredibly simple. But, it will always create an identifiable visual effect because the same design elements are used in every application.
I LIKE TO BREAK CRAFTSMAN WINDOW TRIM INTO TWO SECTIONS: UPPER WINDOW AND LOWER WINDOW.
Upper craftsman window trim consists of side casings, fillet strip, frieze board and cap (pictured below).
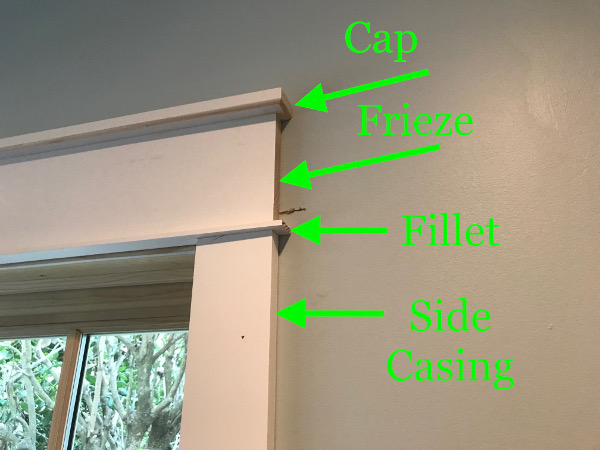
Craftsman window trim upper components.
Lower craftsman window trim consists of a stool and an apron (pictured below).
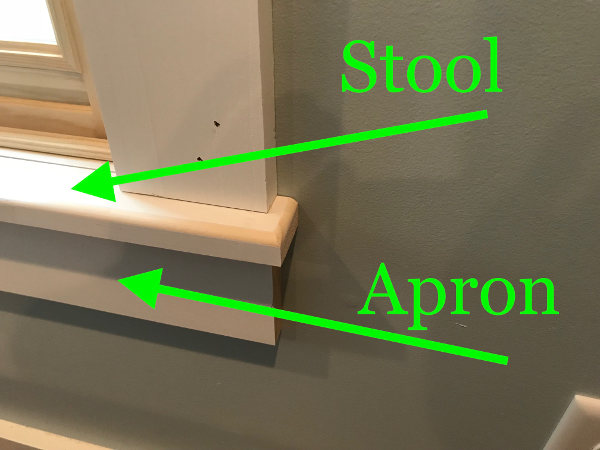
Craftsman window lower components.
Dimensions and details for these various components can vary widely from house to house. Each element can be elaborated upon with subsidiary trim. Alternatively, elements can be enlarged, or even disposed of altogether in some cases.
For instance, the stool (some erroneously call it a “sill”) in my project ran straight across the face of the window jamb. However, in most cases, the stool sits on top of the bottom jamb. In that case, it notches around the inner face of the side jamb.
Are you installing new craftsman window trim in a finished house. If so, always match existing trim profiles as closely as possible. That way, your new window trim won’t look out of place.
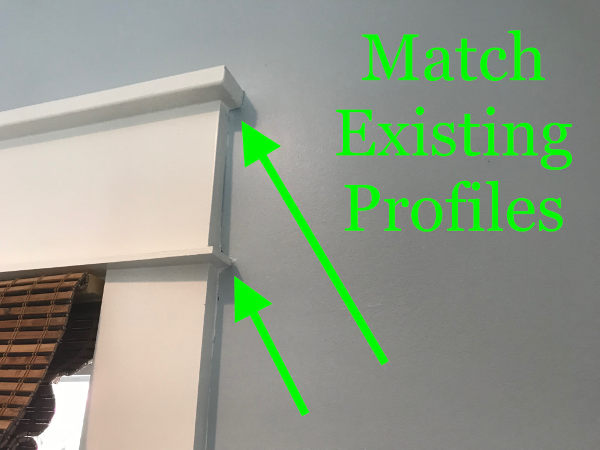
Match existing trim profiles in house or room.
With these considerations in mind, I’ll walk you through my craftsman window trim installation. In this case, it’s on a newly installed double window. The techniques I use here will serve you well on any craftsman window trim project!
STEP 1: ADDRESS WINDOW INSTALLATION ISSUES
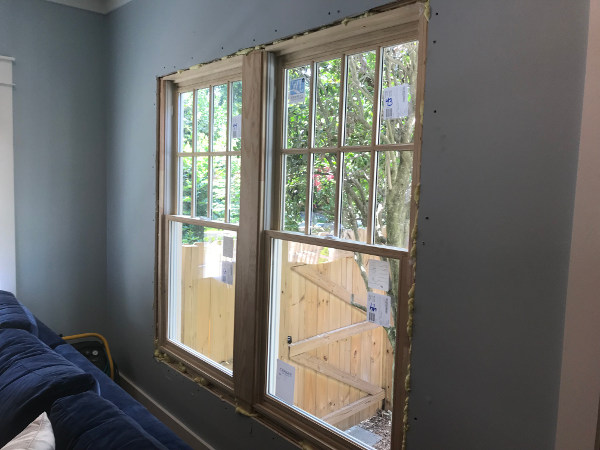
Newly installed double window unit.
It’s much easier if newly installed windows fit like a dream. And if there are no obstructions to trim installation.
Unfortunately, that’s just not the case. Ever.
Framers have their hands full just getting windows to fit into their openings, sit level, and remain secure. But, as conscientious as they are, they can rarely get new window units to fit perfectly into a wall. Plus, they often have to install various caulks and foams to ensure good insulation.
LET’S GET GOING!
To start this project, I first cut out the spray foam insulation that extended past the wall face.
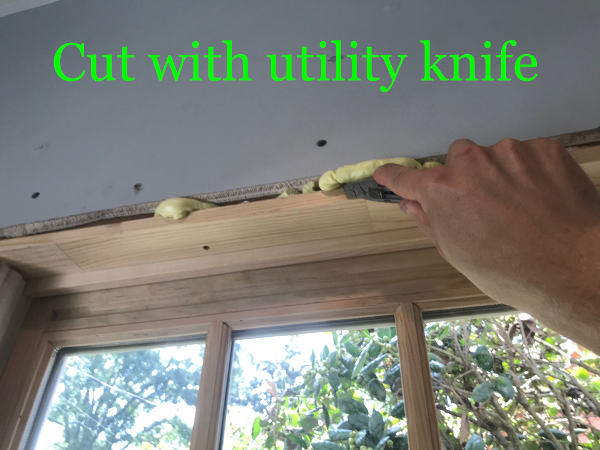
Cut exposed foam with a utility knife and break it off.
Usually, the foam can easily be cut with a sharp utility knife and removed. Just cut it back far enough that no bit of it extends past the jamb edge.
With the window perimeter cleaned, I then addressed a more difficult issue. In this case, there was unevenness between the drywall face and the jamb edge.
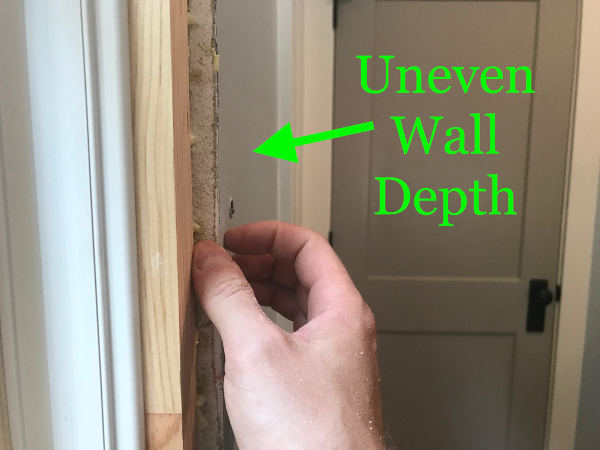
Uneven depth between drywall surface and jamb edge.
In older houses, this is frequently a problem. The existing wall is thicker than the jamb width of the new window. If you don’t first address this issue, you’ll see an obvious gap between the trim and the jamb!
HERE’S WHAT I HAD TO DO:
I had to address this issue before I could install the trim. In this case, I attached ripped furring strips to the jamb face to bring it flush with the drywall. (This is where a table saw really helps!)
First, I measured the depth difference around the entire perimeter of the window, and took the average of those measurements. This was about 1/4″. So, I set up my table saw and ripped pine 1×4 to this width. (Note: the strips were 3/4″ x 1/4″).
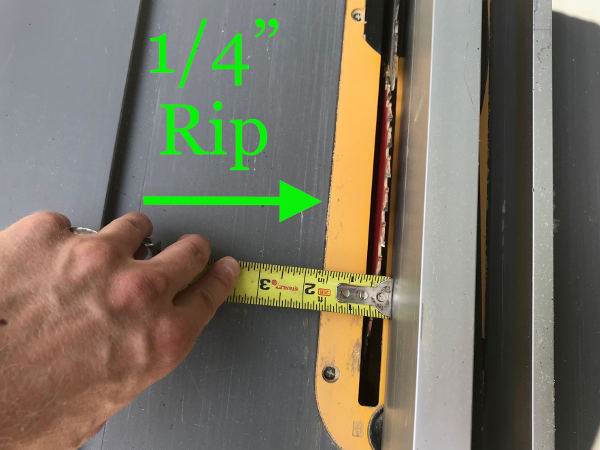
Set up table saw for 1/4″ rip cut.
I cut enough for four jambs. Next, I used the miter saw to cut these pieces to lengths that matched the lengths of the jamb perimeter.
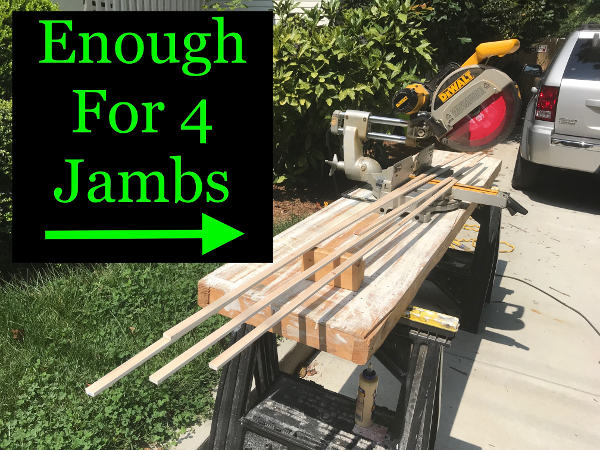
Make enough jamb furring strips for all four jamb edges.
I brought the pieces into the house and spread glue on their backs.Then I shot them onto the edges of the jambs, using 3/4″ brad nails.
ANOTHER NOTE:
It’s important not to use nails that are longer than necessary in situations like this. Long, skinny brads can follow the wood grain. If that happens, they curl and punch out of adjacent trim faces. Be careful; you can catch one in the finger! Ideally, try to get about 5/8″ of nail into the jamb. Here’s a pretty good article on brad nailer safety.

Shoot furring strips onto jamb edge with brad nails.
When you “fur out” a jamb like this, get the shim edge perfectly flush with the jamb edge. A little sanding, caulk and glue can make the seam between them disappear. (The glue helps).

Furring trim has brought edges flush around window.
STEP #2: MARK REVEALS
“Reveals” are architectural details found on most every door and window. They make the trim look clean and aesthetically pleasing.
Reveals are created when you offset the edge of the side casing from the face of the jamb. Typically, by 3/16″. That way, you create a step effect between the two trims.
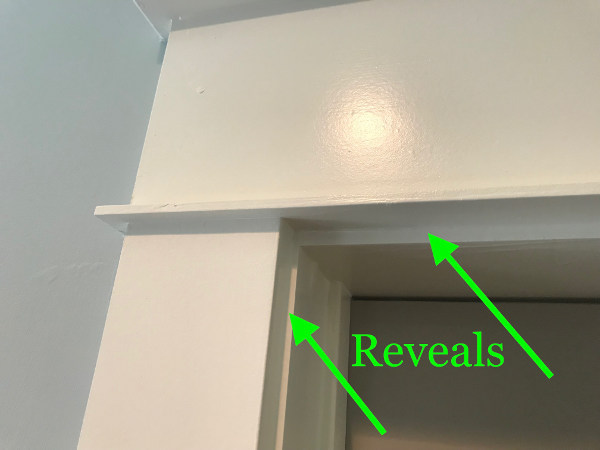
Reveals can be found on most every door and window.
Before you trim the window, mark your reveals. This way, you pull measurements to the marked lines, so you can then plot the spacing for each cut.
I used a combination square to do this. (See the link above). By locking the blade 3/16″ from the end, I easily pressed the tool into jamb corners and marked the edge with a pencil. In the photo below, notice the pencil lines that form a corner. Later, I used these corner marks when I measured for my cuts.
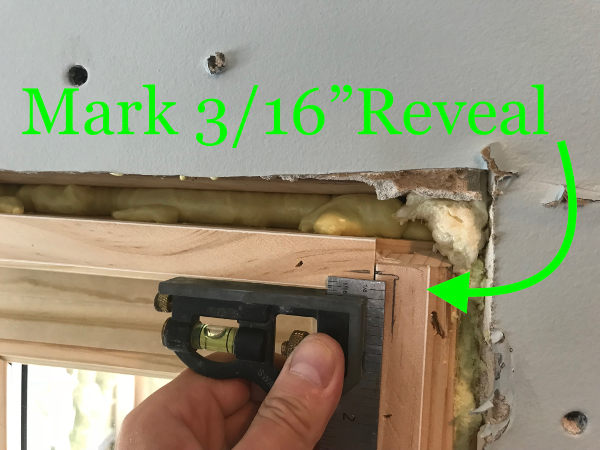
Use a combination square to mark 3/16″ reveals.
STEP #3: MEASURE AND CUT SIDE CASINGS
With the reveals marked, I measured and cut the side casings. (Normally I would install the window stool first. But in this case, because the stool wasn’t notched, it was easiest to do side casings first.)
To measure, I gently butted my tape tab down onto the face of the bottom jamb and pulled the tape upward.
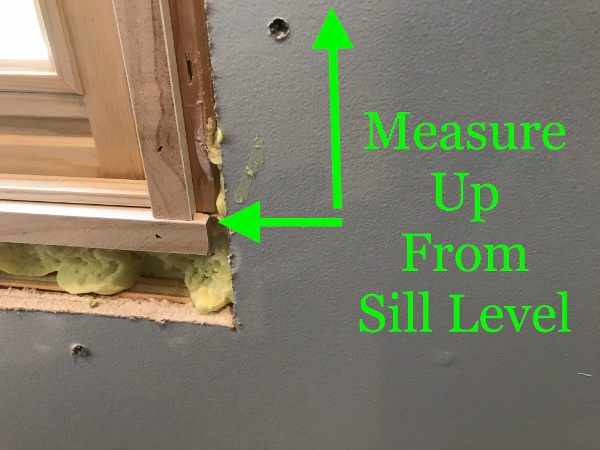
Measure up to reveal marks from sill / stool level.
I sighted along the tape at the corner reveal mark I had just plotted to find my casing length. Next, I measured both sides, rather than trust any uniformity in the window assembly.
After that, I cut pieces of 1×4 pre-primed pine to these lengths using my miter saw. I cut both pieces out of a single 12′ piece. To make this easier, I made a “split” cut at the center first. That way, I could then pull both measurements from my nice, clean cut ends.

Pull measurements from a freshly cut square end for accuracy.
STEP #4: ATTACH SIDE CASINGS
With my pieces cut, I brought them inside and held them in place against the wall.
I always take a lot of time lining up the pieces correctly before I shoot them on. This is so I can see the piece from multiple angles. I want be sure that everything. This includes checking the reveal mark, the edge of the jamb, and the stool line below.
First, I shot the casings into place with a few 2″ brad nails through the outer edge of the casing. These brads will almost always hit framing in the rough opening.
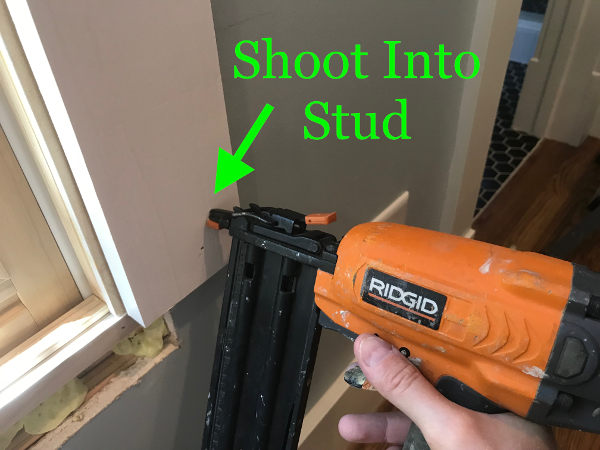
Shoot through the casing into framing using 2″ brad nails.
Next, with the casings secured to studs in the wall, I dealt with the inner side of the casing. Here, I switched over to 1-1/4″ brad nails. Once again, I wanted to avoid nails turning out through the jamb face.
I lined up almost with the extreme edge of the casing piece. Then I shot brad nails into the jamb edge, aiming away from the window sash at a shallow angle.
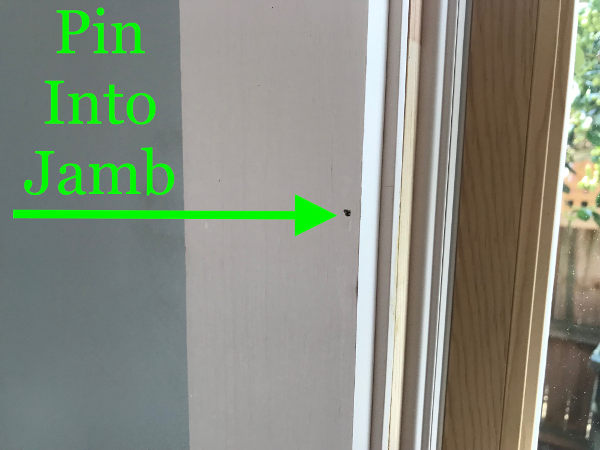
Pin casings to jamb edges using shorter brad nails.
You don’t need too many well-placed brad nails to hold a piece in place. Three or four up the jamb side, and three or four more up the framing side is often plenty. No use creating more nail holes than necessary!
STEP #5: MEASURE AND CUT HEAD CASING
The placement of the side casings determines the overall measurements for all the rest of the trim in this project. This is because the head casing and the stool casing line up vertically with the side casings.
To get the length of the head casing accurate, I pulled a measurement across the outer edges of the side casing. We’ll call this measurement X.
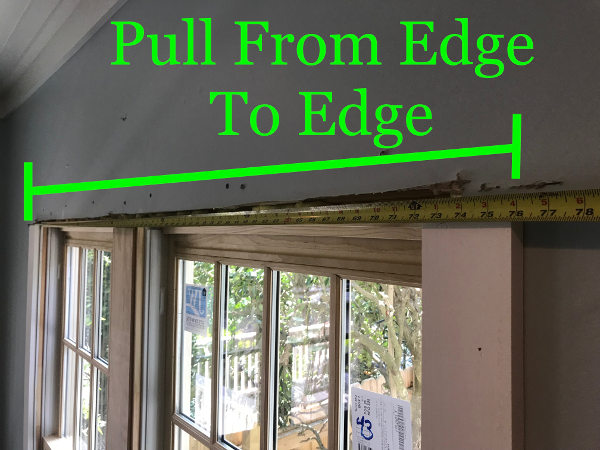
Pull head casing measurements from outer edges of side casings.
THE MEASUREMENTS FOR THE HEAD CASING ASSEMBLY FOLLOW THE CHART BELOW:
–Fillet Strip: X + 1″
–Frieze Board: X
–Cap: X + 1″
(The additional lengths on the fillet and cap account for the overhang of those components.)
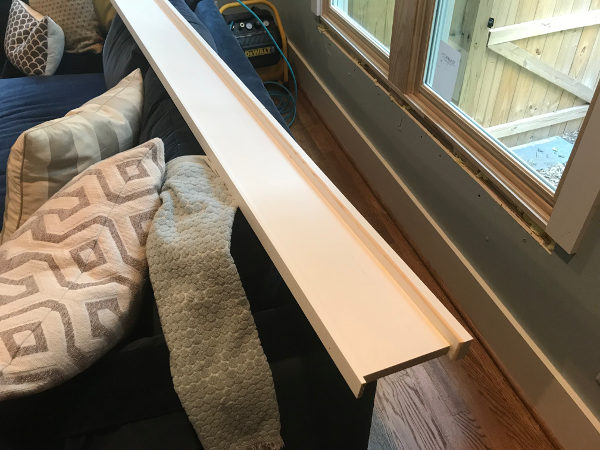
Just to be sure that my measurement was correct, I cut the frieze board from 5-1/2″ pre-primed pine. No width rip was necessary to match the existing profile with this piece.
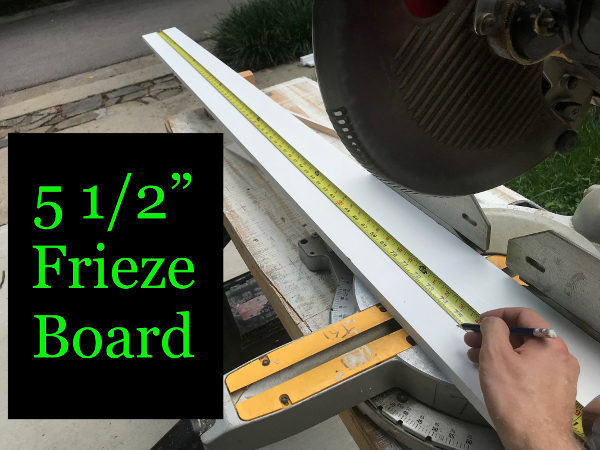
5-/2″ frieze board doesn’t need to be ripped to width.
Next, I brought this piece inside and set it on top of the side casings. You can see that the ends line up perfectly with the outer edges of the casings.
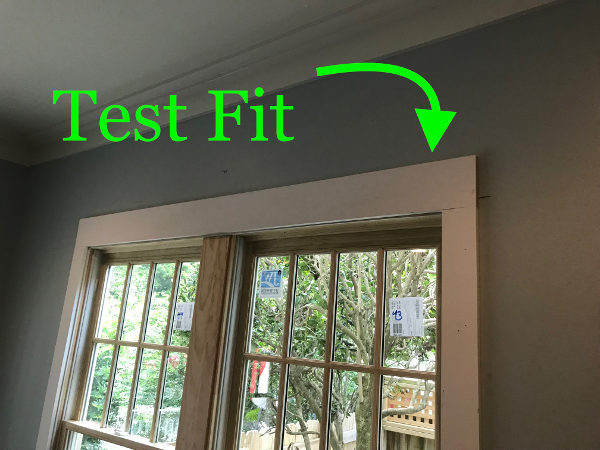
Test fit frieze board before head casing assembly.
AFTER THE TEST FIT
Based upon the test fit, I was confident that the base measurement was accurate. Because of this, I cut both the fillet strip and the cap to their appropriate measurements. These pieces were a little more involved since they both needed to be ripped to widths that matched the existing profiles.
The fillet strip had to be ripped down to 1-1/8″.
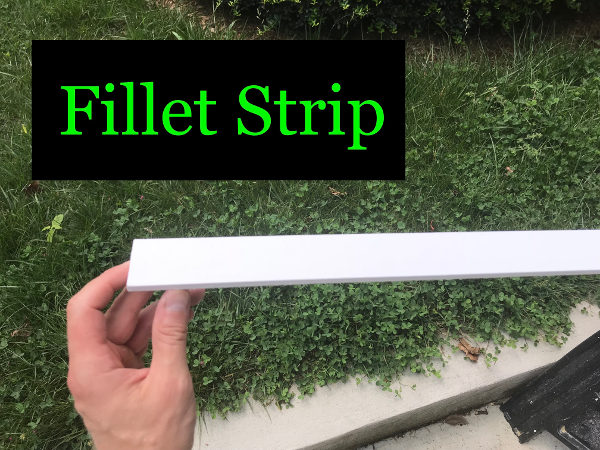
Fillet strip can be found with other trim at lumber yards.
The cap piece had to be both ripped and shaped, since the existing profile had a 1/4″ roundover on the underside of the cap.
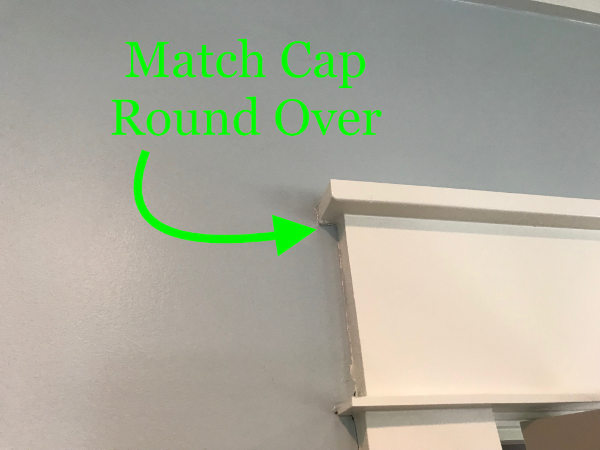
Match cap roundover on existing trim profiles.
After cutting and ripping the cap piece, I made this edge detail by using a router and 1/4″ roundover bit. (1/4″ roundovers are one of the most common profiles in carpentry. It’s always good to have one of these bits on hand for projects!)
NO ROUTER?
If you don’t have access to a router but need to make a similar cope shape like this, you can often fake it pretty well with an orbital palm sander. Just try to leave the corners fairly sharp!

Route cap trim edges with 1/4″ roundover bit.
I clamped the piece to my worktable to keep it from moving around. Then, I routed towards the center from one direction, moved the clamp, and continued routing in the same direction to finish it off.
STEP #6: BUILD AND INSTALL THE HEAD CASING
Full head casing assembly.
BUILDING THE HEAD CASING
I find it’s best to build the head casing away from the wall, then install it as one unit. This keeps the fillet strip from sagging and wobbling, and saves time and frustration.
To do this, I first spread wood glue onto what would be the bottom edge of the frieze board. Then, I laid the fillet strip down onto that edge. I centered it so that it overhung the frieze 1/2″ at both ends (pictured below).
I shot the fillet strip onto the frieze board using 3/4″ brad nails. (Be sure to avoid moving the fillet around while attaching it in your project! Pressure from the gun can cause it to slide.)
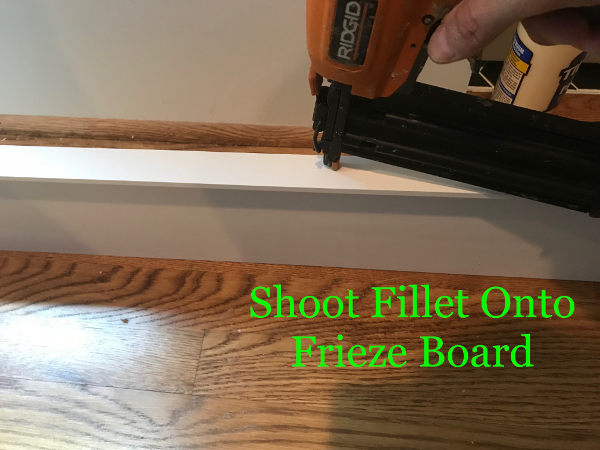
Shoot fillet strip to underside of frieze board.
With the fillet attached, I wiped off any excess glue and flipped the assembly. I spread more glue on the top edge of the frieze, and set the cap onto this edge with the roundover pointing down.
I attached the cap to the frieze board with 1-1/4″ brad nails.
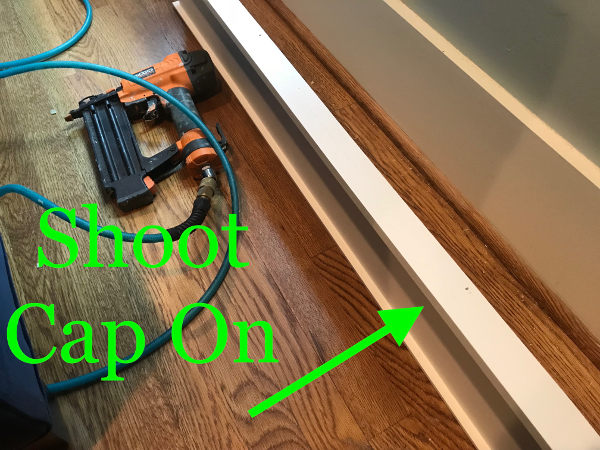
Shoot cap onto head casing assembly.
INSTALLING THE HEAD CASING
First, I moved the head casing assembly into position resting on the tops of the side casings.
Next, I made sure that the assembly was correctly centered over the side casing pieces, with everything lining up perfectly. Finally, I shot the assembly to the wall with 2″ brads.
NAILING AND MULLION NOTES
Generally, headers above window openings are solid wood. Because of this, they provide pretty much unlimited attachment opportunities for trim in this area. You just have to be sure you’re not hitting the air gap below the header, but above the top jamb. Shoot through the trim face in the upper half of the frieze board to be sure you’re hitting lumber.
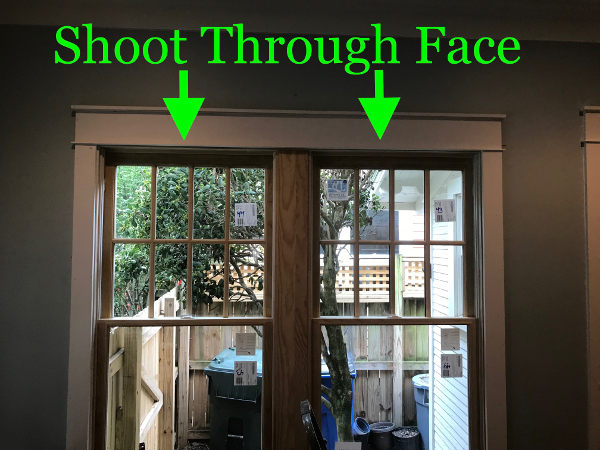
Shoot head casing to wall through face using 2″ brad nails.
(Notice that the center of the window came with a pre-attached “mullion” trim piece. If this had been missing, I would have had to cut and attach one of my own, probably at this point in the project.)
STEP #7: CUT, ASSEMBLE, ATTACH LOWER CASING
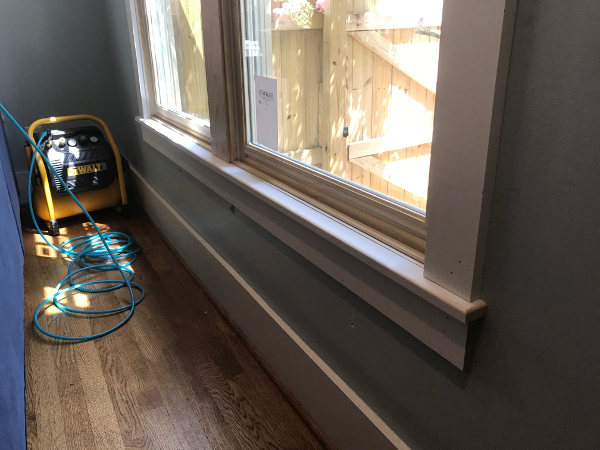
Stool and apron on wall.
The lower window assembly–consisting of the stool and apron–is built and installed in a very similar way for this project.
The stool was the same width as the cap on the head casing. It also had the same roundover routed onto the edge (though the upper edge this time.) The overhang in this location is often referred to as the “horn.”
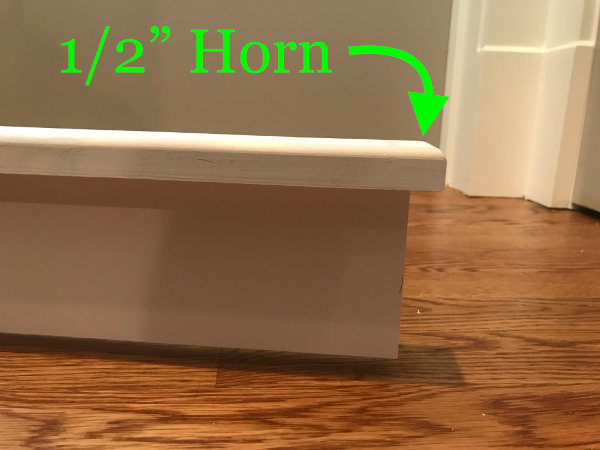
Stool “horn” extends 1/2″ beyond apron and side casings.
CUT
Rather than rely on the bottom of the window being the exact same size as the top of the window, I once again pulled a measurement from edge to edge at the bottom of the side casings. It was, indeed, about 1/16″ bigger.
I used this number (X) to cut lower components to the lengths below:
Stool: X + 1″
Apron: X
ASSEMBLE
Once again, I brought the pieces inside and assembled the pieces. First, I spread glue on the top edge of the apron. Then I shot the stool onto it with 1-1/2″ brad nails.
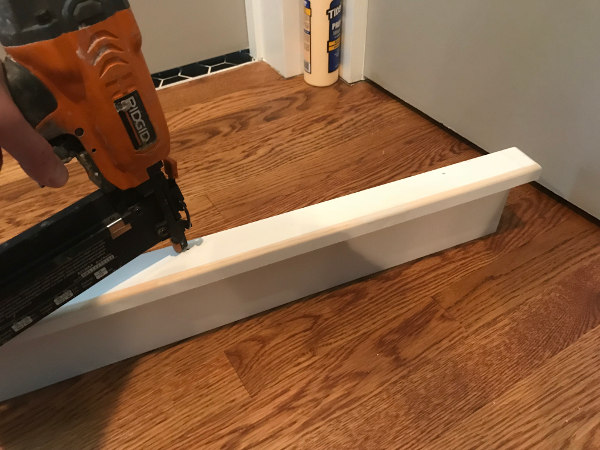
Shoot stool onto apron using 1-1/2″ brad nails.
ATTACH
When the unit was complete, I held it in place. To do this, I lifted it tightly against the bottom ends of the side casings. I shot the unit onto the wall using 2″ brads. (Framing is less available here than it was in the header. Therefore, I made little ticks on the wall where framing members (“cripples”) existed.
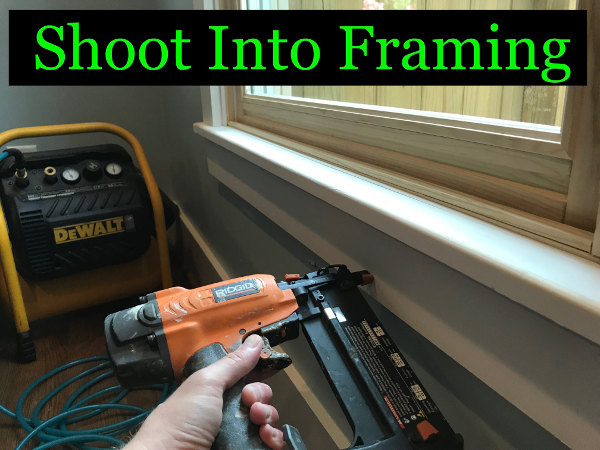
Shoot lower assembly onto wall using 2″ brad nails.
With that, the carpentry portion of my craftsman window trim project was all done!
CRAFTSMAN WINDOW TRIM WRAP-UP:
Other than caulking and painting, I finished this job in just over 2 hours.
I think craftsman window trim is a great introductory project for anyone looking to tackle more complex trim styles. The clean, square elements make measuring and cutting straightforward. Not importantly, the finished product has a stately, classic look.
Ready to tackle your own craftsman window project?
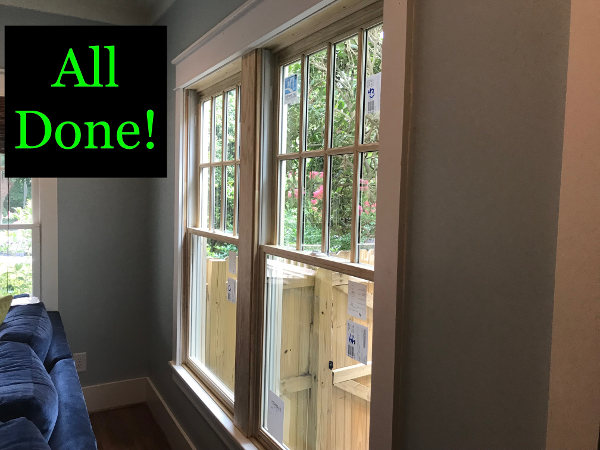
Craftsman window trim job all wrapped up.
Finally, here’s an interesting article about the Arts and Crafts Movement. Reading it, you can learn a bit more about the how these great trim profiles originated.
If you have any questions, or if you have a suggestion for a subject of a future blogpost, please go to our Contact page. Thanks!!
ACCESS MY FREE GUIDE:
The Ultimate Carpentry Checklist
and Glossary!
- Comprehensive Checklist: Quick reference to essential tools, materials, and concepts, color-coded for easy navigation.
- Detailed Visual Glossary: Visual aids to help you recognize and understand each tool and term.
- Expert Guidance: Curated insights from over two decades of carpentry experience.


